Loading…
How to fix old smartphone photos with AI: why early phone pictures look bad, which problems an AI enhancer can fix, which it cannot, and a step-by-step workflow from finding the original to printing.
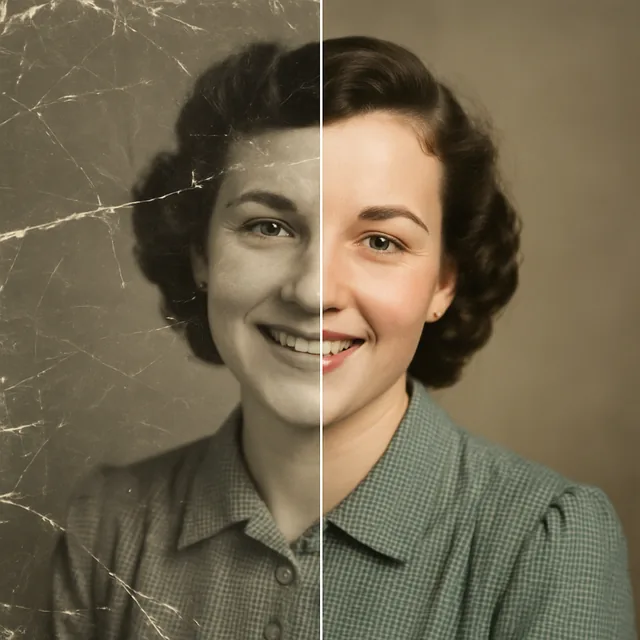
An AI photo enhancer can make old phone photos look dramatically better: it raises resolution, cleans up noise, sharpens mild blur and restores flat colour. The best results come from starting with the original file rather than a copy saved from a chat or social network, and from treating the result as an improvement, not a recovered truth.
If you have photos from phones of ten or fifteen years ago, you have probably noticed they look worse every year. They have not changed; screens have. This guide explains what an enhancer can do about it and how to get the most out of each photo.
Several things stack up:
An enhancer can address most of these, but each has a limit.
| Problem | Can AI fix it? | Notes |
|---|---|---|
| Low resolution | Yes, well | Upscaling is the core strength |
| Noise and grain | Yes | Some fine texture may smooth out too |
| JPEG block artefacts | Mostly | Heavy blocking in skies is hard |
| Mild blur | Partly | Motion blur is harder than soft focus |
| Faded or yellow colour | Yes | Often needs a light manual touch too |
| Tiny faces in a group | Limited | Model invents faces; check carefully |
| Blown-out highlights | No | No data in pure white areas |
| Heavy motion blur | No | Result looks painted, not sharp |
The key idea: an AI enhancer predicts detail that is consistent with what it sees. When there is enough information, the prediction is close to reality. When there is very little, it is a good-looking guess. Our explainer on AI upscalers versus traditional upscaling covers the difference in more depth.
This step matters more than which tool you use. Look for the original file in:
A quick test: check the pixel dimensions. If one copy is 3264 × 2448 and another is 1280 × 960, use the larger one.
If you only want one person from a group photo, crop first. The enhancer then concentrates on what you care about, and you avoid wasting effort on a background you will discard. Do not crop so tight that the face becomes tiny, though; leave some context.
Run the photo through an AI upscaler. For most old phone photos, 2× to 4× is a sensible range. Pushing further rarely adds real detail and tends to give a waxy look.
After upscaling, zoom in to 100% and check:
For more on upscaling, see fixing blurry photos with AI upscaling.
Old phone photos often have a yellow or green cast from indoor lighting. A light correction goes a long way: neutralise the white balance, lift the shadows slightly, add a little contrast. Resist over-saturating; it makes the enhancement look fake.
For scanned prints with fading and scratches, a full restoration is the better tool. Our guide to restoring and colourising old family photos covers that workflow.
Some kinds of old phone photos need a slightly different approach.
Night and indoor party photos. These are usually the noisiest. Denoising helps a lot, but pushing it hard turns faces into smooth wax. Accept a little grain; a lightly grainy photo looks like a real photo, while an over-cleaned one looks artificial. If the photo was lit by a single warm bulb, correcting the colour completely can look odd, so leave some of the warmth.
Stills taken from old phone videos. Early phone videos were often very low resolution, and a single frame from them carries even less detail than a photo. An enhancer can make a frame usable for a small print or a slideshow, but expect it to invent a lot. Pick a frame where nobody is moving; motion blur in a video frame is common and hard to fix.
Group photos. Enhance the whole image first and look at each face at 100%. If one or two faces look wrong, it can be better to crop them into separate images, enhance each one, and keep the group photo lightly processed rather than forcing the model to reconstruct every small face at once.
Photos with flash. Old phone flashes created harsh highlights on foreheads and noses, sometimes pure white. The enhancer cannot recover detail there. A light overall exposure adjustment can soften the look, but the bright patches will stay bright.
If you have hundreds of old photos, enhancing every one is not realistic. A simple triage helps:
Doing it in batches of a dozen or so, by event or year, makes the job feel manageable and keeps your colour corrections consistent within each set.
Old phone photos often include children, friends and people who never expected to appear online. Before you upload anything to an online tool, check what the service does with uploads: whether they are stored, for how long, and whether they are used for training. Our guide to what to look for in AI photo app privacy has a short checklist. If you plan to share enhanced photos of other people, it is courteous to ask them first.
Enhancing a screenshot. Screenshots of photos are lower quality and may include interface elements. Find the file.
Maximum upscale every time. Bigger is not better past the point where real detail runs out.
Trusting invented faces. In a group photo taken from across a room, faces may be partly invented. Do not present the enhanced version as a precise record.
Throwing away the original. Always keep it. Tools improve, and you may want to redo the enhancement in a few years.
Kitana's photo tools include an AI upscaler and photo restoration; you can see them on the Photo Maker page. If you are unsure whether a free plan or a paid one fits a one-off job like this, see free or Pro for a one-off photo project.
Create with Kitana using the tool that fits this guide.
Enhance an old photoDownload Kitana and create your first AI photo in under a minute.